A flat, builder-grade wall is one of the easiest things to upgrade without touching a single structural element, and picture frame molding is leading that shift going into 2026. The technique applies thin rectangular trim panels directly onto an existing wall, adding the kind of architectural depth usually associated with older or custom-built homes.
These picture frame molding ideas cover spacing, proportion and paint — the details that separate a wall that looks intentionally detailed from one that looks like trim was applied without a plan.
What Picture Frame Molding Actually Is
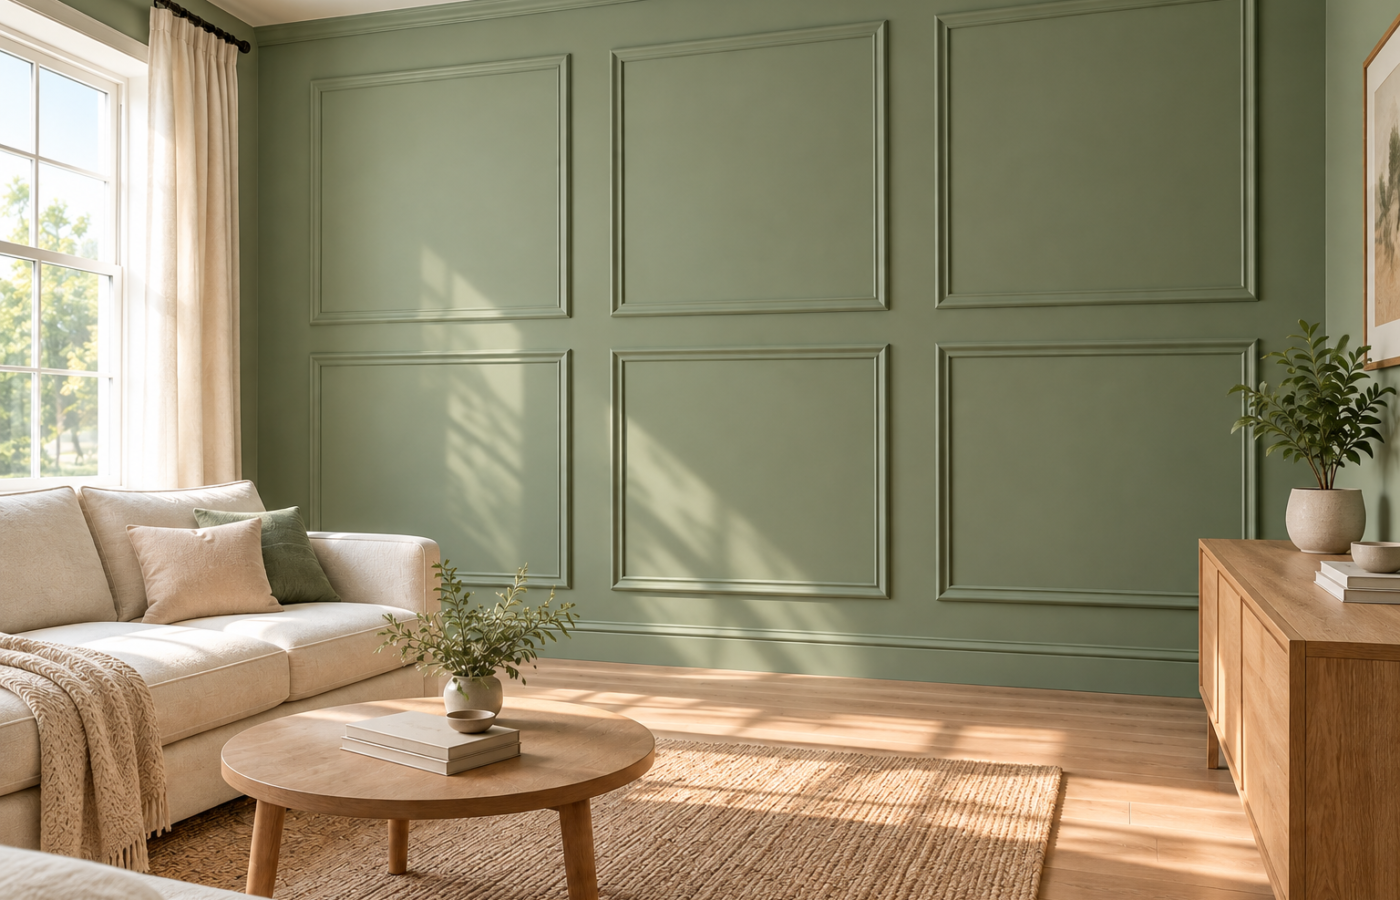
Picture frame molding uses flat or lightly profiled trim strips, cut and mitered into rectangles, then attached directly to the wall surface with adhesive and a few finish nails. It’s a lighter, more DIY-friendly version of the decorative molding that’s traditionally been built into a wall rather than applied on top of one. Unlike wainscoting or full paneling, most picture frame molding ideas need no new drywall or structural work — the existing wall stays exactly where it is, with trim layered on top.
1. Plan the Layout Before Cutting Anything
Measuring the full wall and sketching the rectangle grid on paper (or with painter’s tape directly on the wall) before any trim gets cut is the single most important step among picture frame molding ideas. A layout that looks even on paper often needs small adjustments once it’s taped up at real scale, and catching that before cutting saves the most material.
2. Keep Proportions Consistent Across the Wall
Rectangles that are close in size and evenly spaced read as intentional, while noticeably mismatched proportions can make the same picture frame molding ideas look accidental instead of designed. A consistent margin between each frame and consistent frame width are what a viewer’s eye actually notices, even without measuring anything directly.
3. Account for Outlets, Switches and Vents
Working the layout around existing outlets, light switches and vents — rather than discovering the conflict mid-installation — is one of the most commonly skipped picture frame molding ideas. Centering a rectangle around a fixture, or adjusting its size slightly to avoid one entirely, both read as more intentional than a frame that awkwardly cuts through a switch plate.
4. Use Caulk to Hide Seams Before Painting
Running a bead of paintable caulk along every seam and nail hole, then smoothing it before it cures, is what gives picture frame molding a seamless, built-in look rather than an obviously applied one. This step matters more here than on almost any other DIY wall project, since visible seams are the fastest way to spot an amateur installation.
5. Paint the Molding the Same Color as the Wall
Painting the trim and the wall behind it in the same color lets the molding read as pure architectural shadow and shape, which is the look most current picture frame molding ideas are going for in 2026 — a shift away from the higher-contrast white-on-color combinations that were more common a few years ago.
6. Scale Frame Size to Ceiling Height
Taller ceilings can support larger, taller rectangles, while a standard 8-foot ceiling generally looks more balanced with shorter, wider proportions. This is one of the picture frame molding ideas that’s easy to get wrong by copying a photo from a completely different room without adjusting for the ceiling height it was actually designed for.
Doing This as a Renter
Picture frame molding is more of a permanent addition than paint alone, so it typically needs landlord approval before installation — unlike the fully reversible accent wall painting or peel-and-stick options in this niche. Where it is allowed, a lighter adhesive-only installation (no nails) makes eventual removal considerably easier than a fully nailed one.
Budget and Timing
A single accent wall’s worth of picture frame molding ideas typically costs $60-150 in trim, adhesive and paint, and takes a full weekend from layout to final coat. Pre-primed MDF trim keeps costs down significantly compared to solid wood, and it paints just as well once the seams are properly caulked and sanded.
Where to Start If This Is Your First Time
A smaller wall — a hallway, a home office accent wall, the back of a bed’s headboard wall — is a much more forgiving place to try picture frame molding ideas than a large, highly visible living room wall. Fewer rectangles means less cutting practice needed and a lower cost if the first attempt needs adjusting before moving on to a bigger room.
Common Mistakes to Avoid
- Skipping the paper layout. A grid that looks fine by eye often needs adjusting once it’s actually taped up at real scale.
- Ignoring outlets and switches during planning. Working around them after the fact usually looks worse than planning for them from the start.
- Leaving seams uncaulked. Visible gaps and nail holes are the fastest way for an otherwise clean installation to look unfinished.
- Copying a layout without adjusting for ceiling height. Proportions that work in a tall room can look oversized or undersized in a standard 8-foot room.
FAQs
Is picture frame molding difficult to install myself? It’s more planning-intensive than most paint projects, but genuinely achievable as a DIY weekend project with a miter saw, adhesive and some patience for the layout stage.
Does picture frame molding work in a rental? Usually only with landlord approval, since it’s a more permanent addition than paint — an adhesive-only, no-nail installation is easier to remove later if approval is given.
Should picture frame molding be painted a different color than the wall? Current picture frame molding ideas mostly favor painting the trim the same color as the wall, letting shadow and shape carry the detail rather than color contrast.
How much does a picture frame molding wall cost? Typically $60-150 for a single accent wall, depending on trim material — pre-primed MDF keeps costs lower than solid wood.
What size should the rectangles be? It depends on ceiling height — taller ceilings suit larger, taller rectangles, while a standard 8-foot ceiling generally looks better with shorter, wider proportions.
Can picture frame molding go around outlets and switches? Yes — planning the layout to center a rectangle around a fixture, or adjusting its size to avoid one, both look more intentional than cutting through a switch plate after the fact.
Tools Worth Having Before You Start
A miter saw (or a miter box and hand saw for a smaller budget), painter’s tape and a level for the layout stage, adhesive caulk, a nail gun or finish nails, and a caulk gun cover the basics for most picture frame molding ideas. A stud finder is also worth having, since anchoring into studs where possible adds extra security beyond adhesive alone.
Choosing Between Flat and Profiled Trim
Flat, low-profile trim strips give a cleaner, more modern read that suits most current picture frame molding ideas, while a trim with a lightly curved or stepped profile leans more traditional and casts a slightly stronger shadow line. Neither is more correct than the other — the choice mostly comes down to whether the rest of the room’s trim and furniture already lean modern or more classic, similar to the same style call behind striped ceiling ideas elsewhere in a home.
Applying This in a Small Room
None of these picture frame molding ideas need a large wall to work — a narrower version of the same grid, scaled down with smaller rectangles and tighter spacing, works just as well in a small bedroom or a compact home office as it does across a full living room wall. In a small space, molding is often a lower-cost way to add real detail than furniture or a larger renovation would be, since the material cost for one modest wall stays fairly low.
The Bottom Line
The best picture frame molding ideas start with a careful paper layout, keep proportions consistent and scaled to the room’s ceiling height, and finish with properly caulked seams before a single coat of paint goes on. Done this way, a flat wall gains genuine architectural character in a single weekend, without any structural work at all.
Related:
Accent Wall Painting Tips: 5 Easy Moves for a Clean Finish · Striped Ceiling Ideas for 2026: Easy Ways to Try It